Installation and Usage
Usage#
There are three different ways to use dune-copasi:
Graphical User Interface#
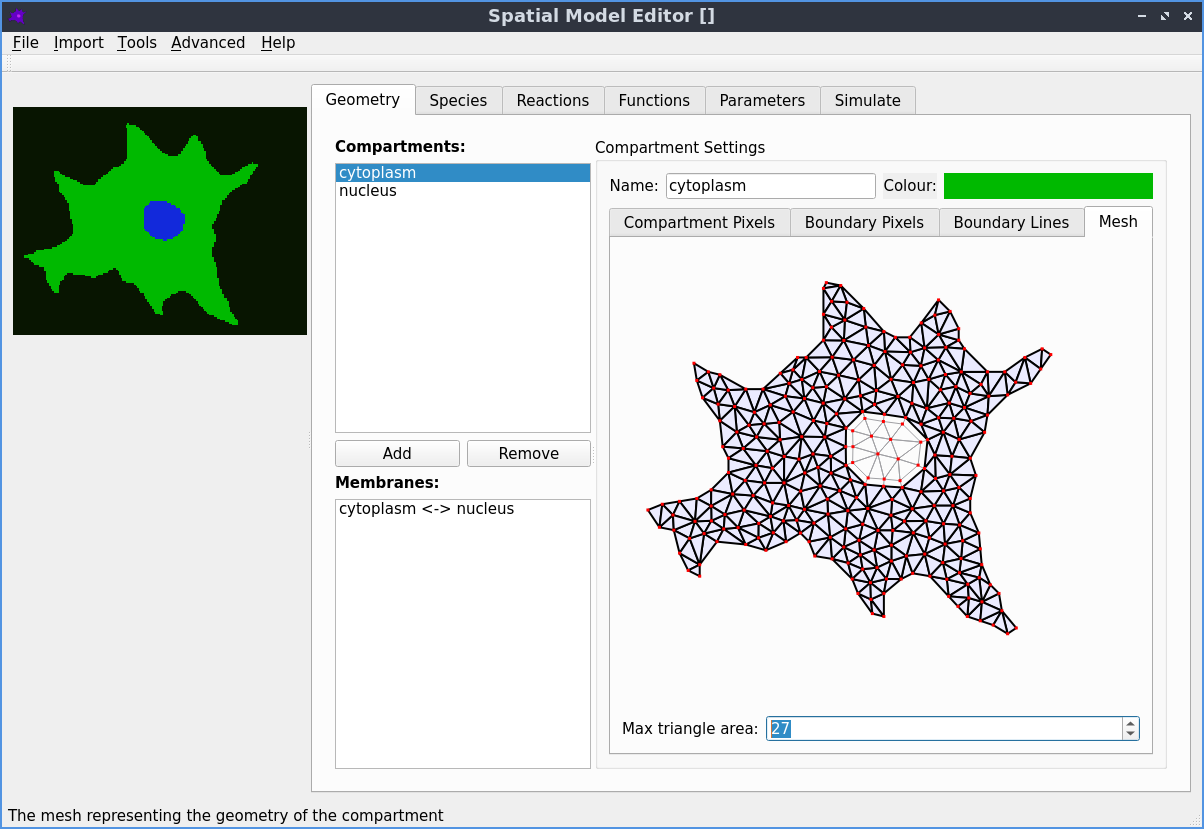
The Spatial Model Editor
is a user friendly GUI editor to create and edit 2D
spatial Systems Biology Markup Language (SBML)
models of bio-chemical reactions. Additionally, it can simulate them with dune-copasi. A big
adventage of this package is that is tailored for biologists and is availalbe
with just a pair of clicks on the major plataforms. Find more information
here!
Configuration File#
In this form, dune-copasi provides one executable for single compartment
systems (dune-copasi-sd) and another one for multiple compartment systems
(dune-copasi-md). Both executables expect one INI configuration file
which shall contain all the information to perform the simulation.
Find more information about available configurations on the Parameter Tree documentation. This form may be installed in one of the following procedures:
Application Programming Interface#
The dune-copasi C++ objects may be consumed by other programs in order
to generate custom simulation rules, to couple intermediate steps with other
tools, or to implement another GUI, etc. In such a case, dune-copasi must be
available in development mode and the downstream library is expected to
consume the library by using the
CMake build system and use the C++ objects in code.
This form is avaliable on:
Installation#
Graphical User Interface#
To install the Spatial Model Editor, please refer to its installation instructions:
Docker Runner#
The easiest form to use our executables for INI usage, is by using a Docker Container. There, the software is boundled such that no installation other than docker is required.
Install Docker#
First, get and install Docker following the docker installation instructions.
Prepare a working directory#
To be able to easily share data between your operating system and the docker
container, prepare a working directory with read/write rights to other users
(e.g. a folder named dune-copasi):
This working directory will be accessible to your text editor, paraview as
well as to the dune-copasi-md executable inside the docker container. Thus,
move or create your configuration files into it at will.
Run the program#
Here, you may pull and run the latest stable container from our
GitLab registry.
To do so, call the docker container with a configuration
file config.ini using one of the following commands on the terminal:
- Multi Domain
- Single Domain
The results of those computations will be written on current
directory as mentioned above. For more information about running docker images,
visit the docker run documentation.
Debian/Ubuntu and macOS Packages#
For Debian/Ubuntu/macOS users that want to make use of dune-copasi
with INI usage, installation is as simple as:
- Debian/Ubuntu (apt)
- macOS/Linux (brew)
Once installed, the programs dune-copasi-sd and dune-copasi-md will be
available on the command line:
To remove the package call the following command on the terminal
- Debian/Ubuntu (apt)
- macOS/Linux (brew)
Docker Build#
Advanced users, who may want to make modifications the dune-copasi
code but do not to install all the dependencies may opt for a docker build. In
this case, you must download the dune-copasi source code, modify it, and build
a new local docker image:
This will build all dune dependencies as well as the new modified version of
dune-copasi. Then, follow the Docker runner guide to run
the new image with tag dune-copasi.
Manual Installation#
Finally, to locally build and install dune-copasi we requires to obtain, compile
and install a variety of dependencies.
Operating Systems and Compilers#
The manual installation is known to compile and run under Debian/Ubuntu, macOS, and Windows. In all three cases with Clang and GCC based compilers. It is however, known to not be compatible with Microsoft Visual Studio.
Dependencies#
The following list of software is required to install and use dune-copasi:
| Software | Version/Branch |
|---|---|
| CMake | >= 3.1 |
| C++ compiler | >= C++17 |
| libTIFF | >= 3.6.1 |
| muParser | >= 2.2.5 |
| dune-common | == 2.7 |
| dune-geometry | == 2.7 |
| dune-grid | == 2.7 |
| dune-uggrid | == 2.7 |
| dune-istl | == 2.7 |
| dune-localfunctions | == 2.7 |
| dune-functions | == 2.7 |
| dune-logging | == 2.7 |
| dune-multidomaingrid | == 2.7 |
| COPASI/dune-typetree | support/dune-copasi-latest |
| COPASI/dune-pdelab | support/dune-copasi-latest |
info
Notice that some required dune modules are forks of original reopsitories and are placed under the COPASI namespace on the DUNE GitLab.
Dune Options File#
An important part of the installation procedure is to tune the build system
flags to accomodate the build to your system. This is done via the dune options
file.
In essence, is just a bash script that sets different flags (mainly the flags
for CMake CMAKE_FLAGS). While the dune project usually leaves this open for the user, we
provide a dune-copasi.opts file with sensible default options for the main
operating systems.
This file can be called to show the current configuration:
There are two form to add flags to the dune-copasi.opts file:
Setting enviromental variables starging with
CMAKE_andDUNE_. These variables will be automatically included into the list of cmake flags.Appending new flags into the
CMAKE_FLAGSvariable in thedune-copasi.optsfile (care must be taken to scape quotes):
For more information about the possible options and the dune options file, check out the dune installation documentation and the build system docuentation.
Installation#
The first four dependencies can be obtained by your prefered package manager in unix-like operating systems. e.g.
- Debian/Ubuntu (apt)
- macOS/Linux (brew)
The required DUNE modules (including dune-copasi) can be obtained via
internet by using git. For smooth installation, is
better place all the dune modules within the same directory.
DUNE Version incompatibility
Notice that this procedure assumest that you don't have previous installion of DUNE in your system. If that's the case, uninstall DUNE before continouing, otherwise, version conflicts may be difficult if not impossible to resolve.
Then, build and install the DUNE modules with the dunecontrol script:
For further information on dune module installation process, please check out the dune-project web page.
Run the program#
Once installed, the programs dune-copasi-sd and dune-copasi-md will be
available on the command line:
Importing CMake targets#
If you additionaly want to use the API for
development, you must find and consume the CMake targets from dune-copasi
in your project as follows:
If dune-copasi was installed on a custom directory
(e.g. using CMAKE_INSTALL_PREFIX=/opt/dune), it may be possible that you need to
pass such directory to the CMAKE_PREFIX_PATH when building the project. This way,
CMake can find our targets and configuration: